Intro
I used to have unlimited talk and text and shared 4GB of data with Verizon, for that I pay $60 per month (already in a family plan). Howerver, I don't usually make a lot of phone calls and I barely use the data since I have WIFI at work and home. It's stupid of me to pay big bucks after I found out that there are cheaper plans out there with many prepaid carriers. After looking for a better solution for a while, I decided to go with
Selectel.
I actually considered Selectel and Page Plus (another prepaid carrier). Both are most popular at this time. Page plus is in the business for several years and has a lot of users. It uses Verizon's prepaid network and charge for roaming. Selectel is a new carrier which started in 2013. It uses Verizon's post-paid network (might be more reliable than its prepaid network?) and do not change for roaming. For more information about them, please visit their website, talk to their support staff or do your research online. I found a lot of information on the website of
genius-wireless.com. genius-wireless.com is a dealer of Page plus and Selectel, I am using their service but I don't receive anything from them for this article.
Yesterday, I finally flashed my phone and switched my cell phone service from Verizon to Selectel. It turned out that Verizon's Galaxy Nexus has a reputation of hard-to-flash. Luckily there are already tutorials out there (see my reference at the end of this article). Here I just want to document the the process again in case I need to this again.
Before I go ahead, I have to say I did not bother to try flashing my phone to 3G (I don't really use it), but it can be done. A link has been given if you are interested in flash your galaxy nexus to 3G.
OK, let's start.
Port phone number to Selectel
Call Verizon and tell them your are going to port your number, ask them if there is anything you need to take care of before you do it, whether there will be any charges and how to avoid them. For me, since my contract already ended and I was not the account holder of the family plan I was in, there was no charge and no complications. If you are the account holder of a family plan, you need to let all other lines out of the plan before you can do something on your own number. If you are in a family plan, let the account holder know before you port your number since s/he might want to downgrade the plan before your port your number out.
Ask Verizon to give you:
- Verizon account #:
- Passcode:
- Account holder’s name:
- Billing address:
On your phone, find your phone's ESN (MEID) (
see here for how-to).
With your MEID and the information you get from Verizon, order a free port in service via genius-wireless.com (
link) or other dealer.
Please ask dealer to give you the MIN and SIP. If they ask why do you need them, just tell them you need to manually program your phone.
Preparation:
Software, rom, script and patch files
Please download all the needed software and files
HERE (404MB). Unzip the file to you computer.
Please confirm you have the following files.
In the
Install to computer folder, you should have:
In the
copy to phone folder, you should have
- 52892_page_plus_sprint_phones.prl
- EOS-toroplus-20130617-105.zip
- i515-3g-patch-ga02.zip
- pa_toro-3.60-25JUN2013-064020.zip
- Slim_Gapps.4.2.2.build.5.zip
- toroplus_for_toro_cdma_radio-FC12.zip
There are two other files
- PagePlusSIDList.xls
- script.txt
Hardware
- A Windows PC
- A sim card
- Your phone (with at least 50% power on battery) and USB cord
Now you have everything you need and let's start flashing the phone.
Flashing steps:
Step 0: software Installation
Install Galaxy Nexus Toolkit, ETS 8.5.17, and Drivers of the phone to you computer. When install ETS, there is a step asking you to choose communication port, choose
USB (very important). After installation, restart your computer (very important).
Step 1: Unlock and root your phone, and install custom recovery. [Skip this step if you have done this before.]
- Remove SIM card from your phone. (Don't toss it, you will need it later)
- On phone, Enable usb debugging
- Power off the phone and boot into boot loader (by holding
Power + Volume up + Volume down buttons)
- Connect phone to PC via USB. On your computer, start device manager, if your phone is recognized as Android 1.0 instead of Samsung ADB Interface, you need to update it's driver. On the screen where you're told to Browse for driver software on your computer, instead click on Let me pick from a list of device drivers on my compute at the bottom of the window and select the SAMSUNG Android ADB Interface.
- On computer, Start Galaxy Nexus Toolkit.
- say no to update
- select you android version, option 36 (my was 4.2.2)
- select option "8" to unlock, root your phone
- follow instructions to unlock bootloader (press VOL DOWN then POWER to unlock bootloader when asked)
- Phone will reboot multiple times and you will need to enable usb debugging again. Just follow the instructions. When the phone is finally booted into Android, step 1 is done and your phone is now unlocked and rooted.
Step 2: install EOS, Gapps, toroplus-for-toro-FC12
- On computer, copy all files in the
copy to phone folder to a folder to the root of your SDCARD. I created a folder named PPflash and put all the files in it.
- Unplug the phone and reboot the phone to bootloader.
- On phone, go to recovery mod (hit
volume up twice and then power botton) and you will be in TWRP.
- Wipe/advanced wipe/data, system, cach, dalvik-cache
- Install EOS, Gapps, toroplus-for-toro-FC12 included in zip
- Wipe cache/dalvik-cache and reboot. The reboot will take a long time and skip all the settings asked.
- If tried program the phone before, it is suggested that after loaded into the Android OS, you should do a full
*#*#786#*#* reset to wipe all of your previous attempted programming, if any.
Now you are ready to program your phone.
Step 3: Program your phone.
- Find CDMA tool, enable usb diagnostic mode within it, and back to main screen.
- Dial
*#*#3282#*#*, enter 000000 for MSL, go to Others/ETS and select USB. click OK and back out.
- Connect your phone to your computer.
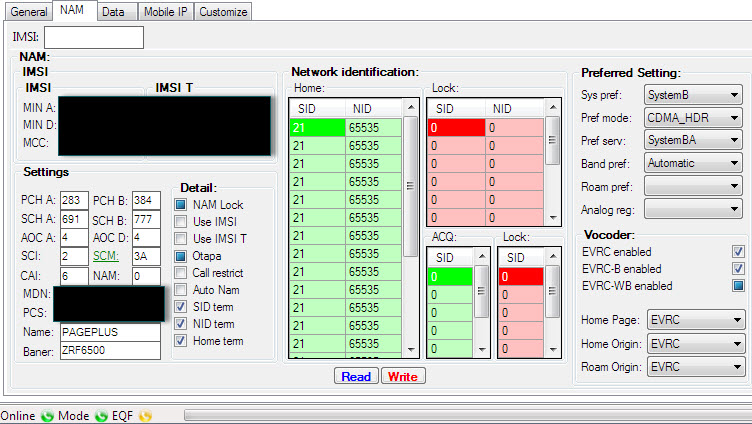
- On computer, start ETS 8.5.17 (run as administrator) and you should see something like this. If the there is no information in the pop-up window, then need to try enable CDMA usb diagnostic mode again.
- Go to ETS's menu: Utilities/Script Utility
- Copy content in script.txt and paste it into Script Utility, follow the instructions in the comments, replacing the first two items with the MDN (phone number), the next 3 with your MIN (MSID), and the remainder with your MDN. The last replacement is the SID, which you had to call your carrier (PagePlus or Selectel) to get. Hhit
run.
- Back in the CDMA Tools app, swipe all the way to the right. Change the directory from
/data/media/ to /sdcard/PPflash and flash the 52896 prl.
- Now you have your phone manually configured to your carrier. If you only need text, talk and 1X data, you not far from done. If you have a donor phone and want 3g, you need to do these steps before going to the next step..
Step 4: Install rom, radio, patch and activate your phone.
- Reboot to recovery. Once again, wipe Data, System, Cache, and Dalvik-cache. Flash your ROM of choice (Paranoid Android included in the files you downloaded), and install Gapps. (I tried to install the Shiny rom but failed :( )
- Last, install the i515 3g patch
- Power off, Install your SIM card, Power on.
- Activate (*228) with Selectel, then option 1 to program your phone. Don't panic when you hear greetings from Verizon, that's not anything wrong since Selectel does use Verizon's network.
- Then, dial *228, option 2 to update your PRL with Verizon. Reboot. Everything should be working: Voice, Data, SMS, MMS.
Note: if there is no dial pad during activation, exit. Try dial
*228+. Hold down the 0 key to get the
+sign.
references :
Guides from dragonhart6505
Guides from innominatethoughts.com
